

Laravel is a new way for me to do full-stack web applications, I’d like to document what I learn and where all the familiar concepts of development are tackled in this framework.
I started out with the Laravel Bootcamp to learn and build my first project. https://bootcamp.laravel.com/introduction. At first, I started out learning with the Blade option https://bootcamp.laravel.com/blade/installation then the Inertia option, https://bootcamp.laravel.com/inertia/installation after following the tutorials, I decided on using the Inertia option (inertia allows us to use a javascript framework like React or Vue as the template).
If you’re also learning Laravel, I would highly recommend that you build the Chirper projects with Blade and Inertia. Then you can continue with this article.
Now that you have an idea of Laravels potential, let’s build a real-world project and piece everything together. We shall call it typography, an app for browsing typography.
composer create-project laravel/laravel typography
Then cd into the typography folder and open the project inside your editor.
cd typography
Then serve the project to preview it. In the javascript world, you’d use npm run dev , or something close. In Laravel, this is how you’d start the server to preview the project.
php artisan serve
Folder structure.

The first thing you will notice is the alien folders and files, I can’t explain why this folder structure exists, but if it made sense to the creators of Laravel, then it should eventually make sense to us too.
As a simple exercise, just go through some of the projects you’ve done, most likely you have a custom folder structure that made sense to you when building said project. How much would we suffer trying to figure out your customized folder structure? A lot, just a bit, not at all
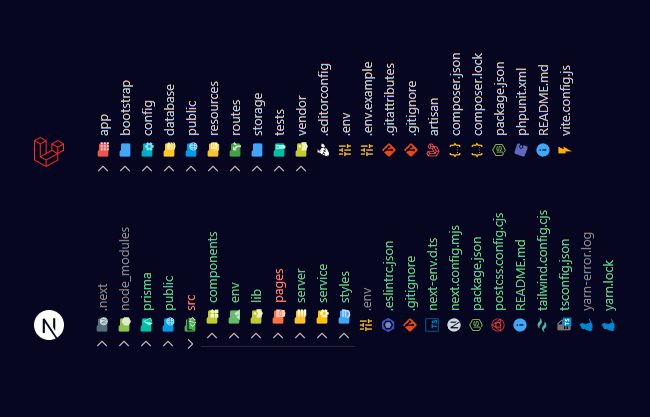
A comparison between the new Laravel installation and one of my NextJS folder structures.Running away from SQL
I must admit that one of the reasons I preferred NextJS is because it was easy to wrap my mind around NoSQL (e.g. firebase & MongoDB) than it was SQL (especially the concepts like migration, models, etc.).
Lately, I understood why I was running away from SQL, I was learning with the libraries (ORM libraries like Prisma) instead of vanilla SQL. It’s like learning React first before Javascript.
And I noticed that SQL was everywhere in one form or another. At this point, I was wondering which SQL I would use, so without any scientific process or review, I chose Postgress. We might as well go all the way in instead of just using SQLite.
Bundling CSS
Let’s first work on the things we know working on other projects, like the CSS pipeline.
Whichever process you use, you will eventually have a CSS file with your styles. (unless you have inline CSS)
Looking at the CSS files, located inside the resources folder (in the Javascript world, this folder would be the src folder). This is where we will write CSS which will be bundled into the public folder.
Sample CSS file
Inside the public folder, let’s manually create a CSS file called style.css and add the following style.
.alert-text {
    background-color: red;
    color: white;
}
Then inside the welcome.blade.php file we can reference the CSS file inside the head tags. Make sure it is the last item inside the <head> tag
<head>
    ...
    <link rel="stylesheet" href="style.css">
</head>
Then add this HTML line right after the opening <body> tag.
<body class="antialiased">
    <div class="alert-text">Alert!! manually adding styles</div>
    ...
</body>
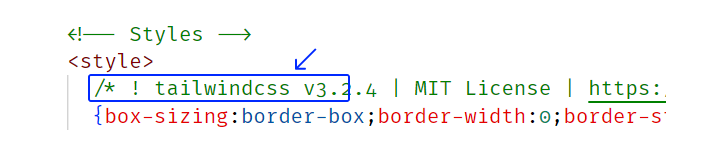
The welcome template uses TailwindCSS
If you look at the <style> tag located inside the <head> inside the welcome.blade.php file you’ll notice a comment. that shows that the template uses TailwindCSS.
Bundling with Vite
The default package.json file already includes everything you need to get started using Vite and the Laravel plugin. So all we need to do is run npm install or yarn

package.jsonIf the two packages are missing inside the package.json file, just install them using npm or yarn
npm install vite laravel-vite-plugin --save-dev
# Or...
yarn add vite laravel-vite-pligin --dev
After installation, you’ll notice a vite.config.js file in the root of the project, which contains the settings used by Vite to bundle assets. Now run npm run dev to start the server in a new terminal. Now you have two servers running, php artisan serve & npm run dev
npm run dev
# Or...
yarn dev
Running both servers together
You can keep on using two terminals open to run the two servers (php artisan serve & npm run dev) or combine the two using an NPM package npm-run-all.
npm install npm-run-dev --save-dev
# Or...
yarn add npm-run-all --dev
Then inside the package.json file, add this script. We first include the php artisan serve script, then combine the serve & dev scripts with the npm-run-all command.
{
    ...
    "scripts": {
        "dev": "vite",
        "build": "vite build",
        "serve": "php artisan serve",
        "start": "npm-run-all --parallel serve dev"
    },
    ...
}
Now we can stop both servers and then run npm run start to start both servers in one terminal. (the --parallel flag is necessary so that they can run alongside one another.
Removing the manual CSS
Now we can delete the style.css file inside the public folder. Then delete the <link rel="stylesheet" href="style.css"> inside the welcome.blade.php file.
Then we can include the bundled assets using the @vite() Blade directive that will automatically detect the Vite development server and inject the Vite client to enable Hot Module Replacement.
<head>
    <!--...-->
    @vite(['resources/css/app.css', 'resources/js/app.js'])
</head>
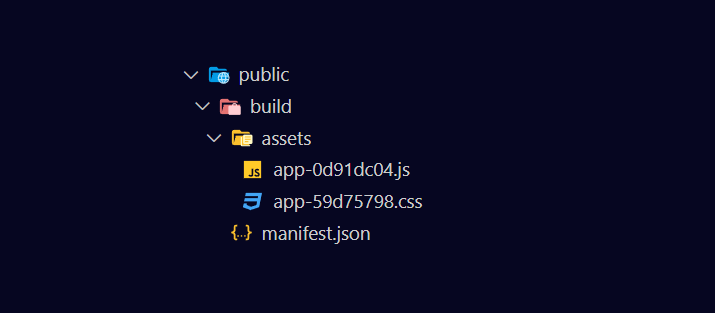
You’ll notice that you won’t see any new bundled assets inside the public folder this is because the files are stored in the running server for ‘Hot Module Replacement’.
But if you stop the server running in the terminal, and run npm run build you’ll now see the bundled asset files in the public folder.
Now restart the server again & reload the browser.
npm run start
# Or...
yarn start
Adding TailwindCSS
To add TailwindCSS to the project, install the following dependencies.
npm install tailwindcss postcss autoprefixer --save--dev
# Or...
yarn add tailwindcss postcss autoprefixer --dev
Then add the postCSS config file in the root of the project. with this content.
export default {
    plugins: {
        tailwindcss: {},
        autoprefixer: {},
    },
};
Then inside the reources/css/app.css file, add the following content
@tailwind base;
@tailwind components;
@tailwind utilities;
Then add a tailwind config file tailwind.config.js in the root of the project. Add this content.
/** @type {import('tailwindcss').Config} */
export default {
  content: [],
  theme: {
    extend: {},
  },
  plugins: [],
}
Then add the files where TailwindCSS will check to compile the styles.
/** @type {import('tailwindcss').Config} */
const colors = require('tailwindcss/colors');

export default {
  content: [
    './resources/views/**/*.blade.php',
  ],
  theme: {
    extend: {},
  },
  plugins: [],
}
Now the Vite compiler will compile TailwindCSS which is a PostCSS plugin